Visit the NeMO-Net site and click the download
option that is appropriate for you. (If you are using an iPad, select the iOS and Mac option)
Install the software. If you encounter security warnings, it's ok to continue--the software is safe.
Open the program and watch the introductory video.
Complete the tutorial.
Week 1: Unit 1--Definining Data in the Humanities
Wednesday 8/25
Key Terms
artificial intelligence
use of computing technology to perform advanced tasks.
This term has been applied to various types of computing
capabilities over time--at one time a hand calculator was
considered "artificial intelligence." When a computing
capability becomes familiar, it generally no longer is
considered AI. Today, AI is generally applied to
machine learning capabilities.
machine learning
a algorithm designed to gather specific data and
identify patterns in the data to solve a specific task.
Once the algorithm is activated, it can recursively
improve--essentially write more code--meaning that
machine learning algorithms can be particularly opaque and
difficult to fix if they do not perform as anticipated.
crowd sourcing
pooling information, input, ideas from a broad range of indiviudals to perform a
task or solve a problem.
gamification
turning a task into a game so that users are incentivized to participate by the
competitive structure; often
participation in the game itself is the reward for participation, but sometimes
the game can have a financial incentive for the winner.
In-Class Exercise 1: Image as Data
Visual data is increasingly important as it becomes easier and easier to capture and transmit images digitally.
The challenge with visual data is that it is difficult for computers to process. Researchers are working on algorithms,
many in the category of artificial intelligence or machine learning, that can improve computers' ability to
classify visual data. Often, they rely on human-computer hybrid models. In this exercise, we will examine projects that use
a hybrid crowdsourcing model and gamification to analyze visual data and train computers to improve their ability to
analyze this data.
Part 1. NeMO-Net example
A. Advance Preparation
*Note: Advance preparation required.
Visit the NeMO-Net site and click the download
option that is appropriate for you. (If you are using an iPad, select the iOS and Mac option)
Install the software. If you encounter security warnings, it's ok to continue--the software is safe.
Open the program and watch the introductory video.
Complete the tutorial.
B. In-Class
If you used the program on a desktop computer, you can work with a partner in class. Otherwise, each member
of the group can work individually on this program.
Launch the program
Classify 1 Coral image. Take note of these things:
What types of visual data is given to the user--that is, what do you learn based on visual information?
What types of visual data are being collected?
How is visual data being collected?
Part 2. Stall Catchers example
For this example, you'll work as a group. Choose 1 person in the group who will sign up for the account.
Everyone should contribute to the classification exercise.
Enter a Username and Email: note, you will be sent an activation link, so use a real email.
Complete the registration process: when you check for the activation link, look in your Junk folder
if you don't see the message, especially if you used your Lourdes email.
Review the brief tutorial.
Work with your group to complete the 10 practice classifications. Take note of these things:
What types of visual data is given to the user--that is, what do you learn based on visual information?
What types of visual data are being collected?
How is visual data being collected?
Part 2. Analysis
Work with your group to answer the questions below.
Based on your experience in these two examples, define what visual data is.
Why is visual data significant? Explain in terms of the examples we examined.
Why, at least for now, are human-computer hybrid models like these necessary for this
type of visual analysis?
Weiskott, "There is No Such Thing as 'Digital Humanities'"
Long and Underwood, "'Digital' is not the Opposite of 'Humanities'"
Key Terms
visual data [from last week]
information based on image, video, or other type of visualization. Specific visual
characteristics based on defined criteria can be identified and classified. In order for
visual data to be used in digital format, humans may be needed to help identify and
translate visual information into a format that is useful in a database or algorithm.
humanities computing:
applications of computing to research and teaching within humanities fields (adapted from CDH Ch 1)
authorship study:
using computer statistical analysis of digitized works
to determine an author's "fingerprint" and determine whether
unidentified texts can be ascribed to a specific author.
For example Shakespeare and Double Falsehood.
batch processing:
computer processing mode (more common in the early days of computing) where an entire process needed to be carried out before any results were reported. Any faults or errors in the batch would result in the entire batch needing to be re-run from the beginning.
serial data access:
storing data in a format (such as magnetic tape) where it can be access only in a linear fashion, where the tape must be read from the beginning to the point where desired data is stored each time the data is accessed.
random data access:
storing data in a format (such as a computer disk) where any unit of data can be accessed in any order, based on a data identification system that can be read by the computer.
Unicode:
one of the first systems (developed 1988-91) for numerically encoding any typeset character in a standardized system. Systems like Unicode allow the precise representation of typeset characters, including diacritical marks and non-Roman characters.
relational database:
collection of items organized as a set of tables that have described relationships. Data can be accessed or reassembled in many different ways based on this relationships without having to re-describe the data within the tables themselves.
archive:
in the context of a digital collection, an archive is a collection of materials where the user chooses the navigation route (adapted from CDH Ch. 1)
edition:
in the context of a digital collection, an edition is a collection of materials that includes additional scholarly context and interpretation of an editor or
editors, and where a navigation route is recommended or enforced structurally.
semantic markup:
markup language that can account for the function of marked text rather than just the form. SGML and its most famous application, TEI are semantic
markukp languages. The most recent version of HTML, HTML5, has moved towards semantic tagging, for example, replacing <i> (italic) with multiple
tags that differentiate function--<em>: emphasis and <cite>: citation.
Topics--History of Humanities Computing
computing in the humanities in each of these eras:
1949-1970s
1970s-1980s
mid-1980s-early 1990s
1990s-present
notable advance/achievement in each of these eras:
1949-1970s
1970s-1980s
mid-1980s-early 1990s
1990s-present
Discussion -- Chronicle articles
Answer the questions below in relation to your assigned article.
Group A: "There is No Such Thing as 'the Digital Humanities'"
Group B: "'Digital' is not the Opposite of 'Humanities'"
What are some of the main criticisms of "digital humanities" that the article is responding to?
What claims in favor of the value of "digital humaities" are made? How are those claims supported?
What is digital humanities, according to this author?
Based on your reading for this week, what do you think digital humanities is?
Week 2: Unit 1--Definining Data in the Humanities
Wednesday 9/1
Key Terms
big data:
extremely large data set that can be analyzed by a computer for patterns. Patterns are then analyzed for meaning.
lexical words:
words in a language that carry conceptual (concrete or abstract) meaning. In English, nouns, verbs, adjectives, and adverbs are lexical.
grammatical words:
words in a language that connect and provide context for lexical terms; they are functional words needed to make the language work. In
English, prepositions, pronouns, articles, and verb particles are examples of grammatical words.
corpus:
a large collection of words belonging to a specific set. It is important when performing corpus analysis to identify the characteristics of the set.
lemma:
"set of lexical forms having the same stem [. . .] differeing only in inflection and spelling" (Francis and Kucera 1).
For example, walk, walked, walking, walks. Conventionally denoted in small caps.
In-Class Exercise 2: Text as Data
Instructions
As discussed in class, text, and the words that make up texts, can be considered data. New computing
capabilities have given rise to new methods for analyzing large amounts of text. In this exercise, we will
experiment with some of these new computational tools.
Part 1: Big Data
Open the Google Ngram Viewer. Look up the terms for your group as indicated below.
Be sure to compare the terms by including them in the same search, separated by a comma. All groups should analyze each of these corpi:
English, American English, British English, English Fiction. Be sure to
check the "case insensitive" box to yield all results for each term.
Example:
T1=telegraph, T2=telephone
timeframe: 1800-2000
Group A:
T1=connexion, T2=connection
timeframe: 1750-2000 (all corpi)
Group B:
T1=honour, T2=honor
timeframe: 1600-1900 (English, British English, English Fiction)
timeframe: 1750-1900 (American English)
Answer the questions below for each corpus you examine. Use the sample spreadsheet in Sakai → Resources → In-Class1
When was T1 in most frequent use? (you can identify a span of years if needed or multiple years if there are multiple peaks.) T2?
List any crossover points.
Describe the change in use in your terms over time, individually, and in relationship to each other.
Why do you think the usage changes in this way? Think about cultural and historical context.
Choose two of your most interesting findings to present to the class.
Part 2: A Special Corpus: Concordances
A concordance is a special type of corpus that focuses on one author, or even more specifically, one work by an author.
In this next phase of analysis, you will use a concordance to further analyze your terms as indicated below.
Group A:
Analyze Jane Austen's use of the terms "connexion" and "connection"
Search for T1 and T2 (separately) in the entire author corpus (select "All" from the drop down list).
Record the number of instances of each, and scan the lists to develop a sense of the way each of these terms is used.
Describe the connotative meaning of each.
Search for T1 and T2 (separately) in each of Austen's major completed novels:
Sense and Sensibility
Pride and Prejudice
Mansfield Park
Emma
Northanger Abbey
Persuasion
Create a table to record the number of instances of each in each work. Be sure to
note the year each work was written. The publication date is noted at the very beginning of each text--or Googlable.
(and read the note at the beginning of Northanger Abbey about publication--this text is a little tricky).
Describe any usage patterns in individual novels (e.g., one term used much more frequently in one
novel etc.), with relevant support from the texts.
Correlate your findings with your work from Part 1: theorize about the use of this term
across Austen's corpus and the use of this term in the culture more generally, supporting your
ideas with data from your research:
Group B:
Analyze the use of the term "honour" across Shakespeare's corpus.
Click the "Search" button and note the total number of hits.
Discuss where you would expect to see the most instances of the term "honour" (comedy, tragedy, history, some combination) and why. Explain:
In order to categorize the plays, we'll use the table of contents of the 1623 First Folio of Shakespeare's works, the first publication of the complete works.
This classification is reflected in the template spreadsheet for your data collection. Download the ic2groupb.xlsx spreadsheet from Canvas → Files → ic02.
Fill in the data for each play in each genre table. Observe the calculations.
In each row is the percentage of the total for each type of play. In the last row is the percentage for that genre of the total number of hits.
Describe key findings of these results:
Compare this to your guess in 5 above:
Choose the play in each category with the most instances. Scan the individual uses in
each of these plays, and describe usage patterns, with relevant support from the texts.
These sections from the "Introduction to Oral History" (available on Canvas)
Discovering Oral History p. 1
Understanding Oral History p. 2
Establishing Ethical Relationships p. 4
Creating an Interview Outline p. 10
Composing Questions p. 11
Getting the Story p. 13
Guest Speaker: John Dewees from TLCPL
Quiz 1
Due: The quiz is open from 5pm Wed 9/1 through 1:30pm Wed 9/8
Instructions:
Access Quiz #1 online through the Quizzes tool in Canvas. This is an untimed quiz. It is recommended that only a
wired internet connection or reliable WiFi connection be used.
Quiz #1 covers the "Introduction to Oral History" reading due for 9/8. The quiz includes multiple choice,
true/false, and short answer questions.
This quiz is OPEN reading and notes. You may retake the
quiz one time if desired.
The highest score of the two attempts will be recorded. Note: this quiz is created from a pool of questions, so a
second attempt will have a different set of questions than the first.
Homework 1: Data
Due: midnight Wednesday 9/8 in the Assignments tool in Canvas
Format:
Variable, based on experiment performed (see below).
Instructions:
Use the concepts we discussed in In-Class #1 and one or more of the data analysis tools we experimented with
in In-Class #2 to perform your own data examination.
Identify the question you are trying to answer:
Describe your method:
Perform your analysis (there may not be anything written for this question).
Document your results:
Interpret your results. List at least one significant finding and explain:
*Note: Some of these were used in class, others were
mentioned in the reference reading. If there is a different text analysis tool you wish to use for your
experiment, check with me for approval.
Evaluation
Your data analysis will be evaluated on the following criteria:
Scope and Method:
question is clearly formulated and significant (not a "yes" or "no" question)
question can be answered with methodology described.
methodology is sound.
Documentation:
documentation is well organized.
results are understandable and usable.
Findings:
conclusion(s) follow from observed results.
conclusion(s) provide new insight/adddress the research question.
In-Class Exercise 3: Audio as Data--Practicing Oral History
Instructions:
In this exercise, we will practice what we've learned about collecting oral histories by
interviewing each other.
Follow the steps below to prepare for and then collect an oral history. Record your interview--
save the recording
to use for practice transcribing later in the term.
Part 1. Data Collection
Create your intro script. The intro script should include
your name, narrator's name
date, time, recording location
this is a Lourdes University project for the DMS 300 class in Fall 2021
Create an informal outline of topics you would like to cover with your interviewee
(you can use the brainstorming from last week to help get you started)
Interview your partner (10-15 minutes). Make a recording using one of the
recommended
recorders listed below
or some other audio recording app that you have.
Take notes about what you hear.
Switch interviewer and interviewee and repeat (10-15 minutes)
Report to the class what you learned
Part 2. Analysis
What were your own strengths and areas to improve as an interviewer:
What were the strengths and areas to improve as an interviewer for your partner:
Part 3. Technology Test
At the end of class/after class, test submitting your audio file to our class drive using the
link below. If you have different options for the file type as you transfer it from your phone
to the drive, choose .mp3 format. Name your file with the interviewee's last name and the date of the interview
in this format: lastname_2021-09-13
An interface with a specific set of tools that can be used to host/display content. Platforms have administrative creation and editing capability for registered users.
Project:
Exhibition of primary literary, historical, artistic, or other material. Projects may focus on providing access (such as scanned versions of out of print text) or
facilitate new types of analysis (such as mapping locations of a specific historical event or creating a searchable version of a text).
Tool:
An interface or app that performs a specific function. Tools usually require specific input (image file, comma separated value text, etc.) and
produce a result.
In-Class Exercise 5: Classification and Exploration of New Technology
Instructions:
In this exercise, we will start learning about teaching technology by using a genre theory approach
to help understand
new and unfamiliar technologies. Then, we will experiment with new technologies to understand how
they could be usefully
applied.
Part 1: Genre Analysis
Visit each of the sites below. Write a brief description of the site and categorize the it as a
project, platform, tool, or
some combination (which ones?) based on the definitions presented in class. Be prepared to
explain why you made the classification you did in each case.
Visit the two sites listed below. What traits to they have in common? How would you describe/name the category they belong to?
What are the key traits of this category?
Once we've classified a technology, we will have a basic expectation of the functionality of that technology and how it might
be applied. Sites like those analyzed in Part 2 are actually built around the idea of classification as the starting point
for identifying and understanding technology and content.
Now, use that classification starting point to help learn a new technology.
Choose one of the tools or projects from Part 1 to examine in more detail.
Examine the interface and explain how it is organized.
Examine the functionality of the tool/project and explain its capabilities
Prepare a brief demonstration to show the class how this tool/project works
Part 4: Analysis
Reflect on your experience.
Once you classified a tool/project, what assumptions were you able to make about it? How did these
assumptions help you understand its functionality?
Explain any difficulties you had in decoding the functionality of a tool/project.
Explain the ways that the tools/projects were easy to use.
How does classification help with learning?
Week 5: Unit 2--Learning and Teaching Technology
Wednesday 9/22
Topics: Theory of Application
identifying the audience
designing objectives
designing an application
analyzing effectiveness
Key Terms
learning objective:
statements that define the expected goals of a learning activity. Learning objectives are created
by the
teacher/trainer, but should be written from the student/learner's perspective (e.g. "by the end
of this activity, students should be able to...")
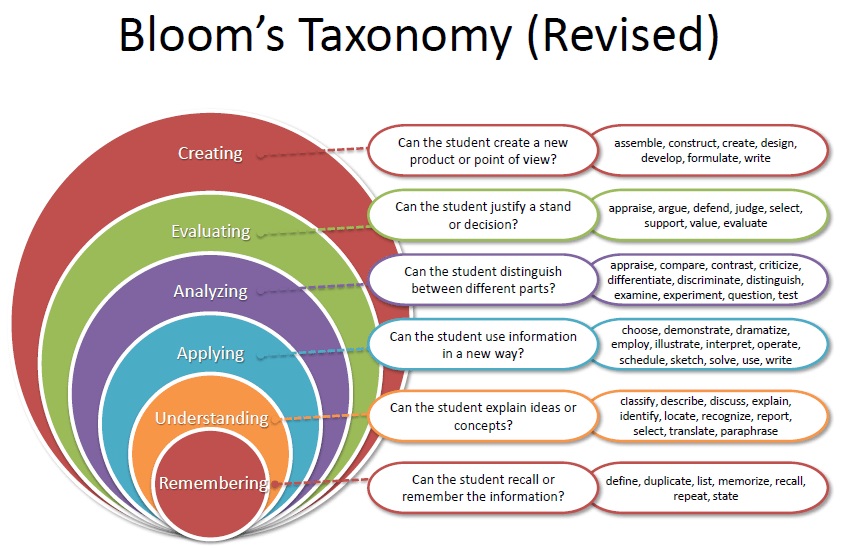
Bloom's Taxonomy of Learning:
hierarchy of different objectives and skills that learners can master.
evaluation:
process for evaluating individual student/learner mastery of a skill/objective with the goal of
providing feedback to the learner. Good evaluation
also includes comments to help the learner understand deficits and improve.
assessment:
process for evaluating student/learner mastery of a skill with the goal of improving the
learning activity.
Special Considerations for Teaching and Learning Technology
developing specific technical skills
applying technology to specific applications
audience considerations: technical proficiency vs. subject matter expertise
interactions:
instructor - learner
learner - instructor
learner - learner
learner - content
learner - technology
In-Class Exercise 6: Reverse Engineering an Exercise
Instructions:
In this exercise we will analyze exercises to help learn how to combine materials and knowledge to
create an exercise.
Part 1. Identification and Examination:
Review In-Class Exercise #5, this time evaluating the
design of the assignment itself. Answer the following questions:
What materials and tools are needed to complete the exercise?
What types of activity are prompted by the assignment (Bloom's taxonomy for critical thinking)?
Describe the organization/methodology of the assignment.
What types of interaction are required to complete the assignment? (for example, what if this
were a fully online assignment--would the written directions be sufficient?)
How is success on this assignment measured?
What objective(s) does this assignment meet?
Part 2. Analysis
Based on your observations and analysis of the 2 examples, answer the questions below.
What is the difference between information and knowledge in these exercises? How does the
methodology of the exercise help students create knowledge from information?
How is technology used in these exercises? What do you think about the use of technology
in teaching and learning more broadly based on these examples?
How do assignment objectives factor in to the learning process, based on your anlaysis
of these examples?
Part 3. Application
Start the preparatory work for Presentation 1, where you will create your own exercise.
Examine the categories of tools and choose one to explore further
Look at the possible tools in the set you choose and pick one to examine further. Be sure to choose one
that you don't need special credentials to access.
Examine the interface and explain how it is organized.
Examine the functionality of the tool/project and describe its capabilities
You will use this tool next week to work on designing an exercise to teach it (or some specific function
of your tool) to the rest of the class.
Examine the categories of tools and choose one to explore further
Look at the possible tools in the set you choose and pick one to examine further. Be sure to choose one
that you don't need special credentials to access.
Examine the interface and explain how it is organized.
Examine the functionality of the tool/project and describe its capabilities
Planning
Write objectives for your exercise. You can start with generalized objectives based on the assignment description
to start, but as you refine your assignment, return to these objectives and make them more specific.
Describe a methodology you will use to teach this tool.
Explain what information inputs will be needed.
Explain what activities will be peformed and the types of engagement these will foster.
Explain what kind of knowledge will be generated.
Describe how learning can be evaluated in this exercise.
Return to your objectives: will the engagements and knowledge your assignment generates meet your objectives? If so, great. If not,
determine whether the objectives need to be adjusted or the assignment needs to be modified and make the necessary changes.
Key Terms
learning objective:
statements that define the expected goals of a learning activity. Learning objectives are created
by the
teacher/trainer, but should be written from the student/learner's perspective (e.g. "by the end
of this activity, students should be able to...")
Bloom's Taxonomy of Learning:
hierarchy of different objectives and skills that learners can master.
evaluation:
process for evaluating individual student/learner mastery of a skill/objective with the goal of
providing feedback to the learner. Good evaluation
also includes comments to help the learner understand deficits and improve.
assessment:
process for evaluating student/learner mastery of a skill with the goal of improving the
learning activity.
Special Considerations for Teaching and Learning Technology
developing specific technical skills
applying technology to specific applications
audience considerations: technical proficiency vs. subject matter expertise
interactions:
instructor - learner
learner - instructor
learner - learner
learner - content
learner - technology
Week 6: Unit 2--Learning and Teaching Technology
Wednesday 9/29
Presentation: Teaching a New Skill
Due: in class 9/29
Format:
multimedia presentation and activity of 20-25 minutes
Instructions:
In this exercise, you will identify a DH tool or project that you can use to help the class meet a
learning objective of your design. You should use your tool/project thoughtfully to help the class move
from information to knowledge in a well-designed, interactive exercise that can be evaluated.
Each member of the group should speak/have a role in the presentation.
Evaluation Criteria:
presentation clearly introduces the objectives and materials to be used
activity engages the class with the materials and technology in a meaningful way
activity produces results that are aligned with the learning objective
the class' mastery of the objective can be evaluated
Unit 3: Introduction to Classification and Databases
a group of objects/items. It may be classified or unclassified
classification:
assignment of something to a class; generally, the grouping together of objects
into classes.
class:
a set of objects that share some property. For example, a literary genre is a class of texts.
member:
one object in a class.
property:
specific trait of members in a class used to classify members. Properties used to sort members should be relevant to the classification scheme.
one-dimensional classification scheme:
classification system based on a single differentiating property. For example, dividing all
humans into "male" and "female" categories.
nominal classification scheme:
a type of one-dimensional classification scheme where the members of the class
are not ordered in relation to each other.
ordinal classification scheme:
a type of one-dimensional classification scheme where the members of the class
are sequenced or ordered in relation to each other (for example, students classified by
freshman, sophomore, junior, senior)
n-dimensional classification scheme:
a classification system that has multiple axes or properties
for classifying members of the scheme. Each property may be
ordinal or nominal. For example, a student record lists
all semesters a student has attended, all classes taken in each semester,
and grades earned for each class.
discrete data:
data is provided in units such as by year or per person.
continuous data:
data is a function of continuous change, such as change over time.
Due: midnight Tuesday 10/5 in the Assignments tool in Canvas
Format:
Completed worksheet. See prompts below.
Instructions:
In this assignment you will evaluate the exercise you designed and presented.
Explain your assignment design:
Did your assignment function as expected in the classroom? Explain.
Explain the evaluation of your assignment:
What was the evaluation criteria--i.e., how did you know if students met the objectives?
How many students met the objectives?
Reflect on these results:
How would you improve this assignment in the future? Explain.
Evaluation Criteria:
all prompts are answered clearly and completely
substantive, thoughtful reflective responses provided as applicable
writing conforms to conventions of Edited American English
Oral History Project Next Steps
Check the spreadsheet in Canvas → Files → service_learning → oralhistory_narr_list_student.xlsx to see
which narrator you've been assigned
Do some research:
read about transformational leadership (PDF in the same folder as the spreadsheet: gibbon_transformationalleadership.pdf
use the URL in the spreadsheet (if applicable) and read more about your narrator
check the "Research Topics" field in the spreadsheet and do some more research and reading to prepare
Make first contact with your narrator: phone first, then send a follow up email
as applicable (see note in the spreadsheet). Be professional when contacting narrators:
Introduce yourself and indicate that you are from Lourdes University
Mention that you are working on the Oral History project with Amelia Gibbon and Reinvest Toledo
Be as flexible as possible when setting up a time to talk, and be sure it's clear whether
the interview will be phone, Zoom, or in person (their preference)
Refer them to me if they have any questions that you cannot answer: "My instructor, Susan
Shelangoskie, can follow up with you about that. When is a good time for her to call you?"
Thank them for being willing to share their time and story
Be prepared to make multiple attempts to contact your subject: don't give up, just
keep trying different times of day until you get through.
Track all of your time for these tasks in your Service Learning Log spreadsheet
multimedia presentation and activity of 20-25 minutes
Instructions:
In this exercise, you will identify a DH tool or project that you can use to help the class meet a
learning objective of your design. You should use your tool/project thoughtfully to help the class move
from information to knowledge in a well-designed, interactive exercise that can be evaluated.
Each member of the group should speak/have a role in the presentation.
Evaluation Criteria:
presentation clearly introduces the objectives and materials to be used
activity engages the class with the materials and technology in a meaningful way
activity produces results that are aligned with the learning objective
the class' mastery of the objective can be evaluated
Week 7: Unit 3--Introduction to Classification and Databases
a group of objects/items. It may be classified or unclassified
classification:
assignment of something to a class; generally, the grouping together of objects
into classes.
class:
a set of objects that share some property. For example, a literary genre is a class of texts.
member:
one object in a class.
property:
specific trait of members in a class used to classify members. Properties used to sort members should be relevant to the classification scheme.
one-dimensional classification scheme:
classification system based on a single differentiating property. For example, dividing all
humans into "male" and "female" categories.
nominal classification scheme:
a type of one-dimensional classification scheme where the members of the class
are not ordered in relation to each other.
ordinal classification scheme:
a type of one-dimensional classification scheme where the members of the class
are sequenced or ordered in relation to each other (for example, students classified by
freshman, sophomore, junior, senior)
n-dimensional classification scheme:
a classification system that has multiple axes or properties
for classifying members of the scheme. Each property may be
ordinal or nominal. For example, a student record lists
all semesters a student has attended, all classes taken in each semester,
and grades earned for each class.
discrete data:
data is provided in units such as by year or per person.
continuous data:
data is a function of continuous change, such as change over time.
In-Class Exercise 8: Defining Classes
Instructions:
In this exercise, you will begin to learn about classification by analyzing a dataset and
discussing how it could be classified.
Part 1: Challenging Assumptions
Consider the data provided and answer the following preliminary questions:
What and the properties of these data items?--brainstorm as many as you can.
Which properties might be meaningful for classification of these items?
To answer this question, indicate what types of questions about the data you could answer if you
tracked specific properties.
Part 2: Context
To design a sound classification system, you need to understand
the purpose and
uses of your data. It's like a rhetorical
situation--remember, rhetoric is understanding
the available means of persuasion and knowing how to choose the most effective for the situation. So too when
thinking about a classification
system: you need to understand the situation and ask some key questions about how the data will be used before
determining your classification system.
Consider the following scenario:
Scenario
You work for a candy company that manufactures different types of candy and distributes it to retailers.
You need to
keep track of the candy inventory and fill orders, and you need
to report on the inventory use to the manufacturing division so that they know how much
of different types of candy to produce.
Below are some sample requests from retailers:
Company A fills coin operated candy machines. They order a
pallet of 25lb bags of
non-perishable candy, no sticks every month
Company B is a food service company that supplies
hospital cafeterias. They order
bulk candy weekly of various types, including sugar free and
nut free (no cross-contamination)
Company C supplies school fundraisers. They only order
twice a year, once in
September for the system-wide candy bar drive and once in March,
for the Spring lollipop drive. The orders are large, but needed in 12-count boxes or 1lb bags
for the individual student sellers.
Company D supplies movie theatres. They order a wide
variety of large or
king-size candies, including some specialty "nostalgia" candy like
salt water taffy, Black Cow Candies, Bit-O-Honey, and Atomic Fireballs.
Knowing this context, what kind of properties do you need to track about
the inventory of each candy? [input]
What properties of the candy itself do you need to know? [input]
What kinds of reports would you need to produce? [output]
After thinking through this new information, come up with a set of classes. Make
some notes
about your scheme, and be sure to identify important primary and
secondary
properties
.
Guidelines for Classification
Avoid cross-classification in one-dimensional schemes/properties
Be consistent in the sequence of properties for each member of the class
Sequence values in an array of values in a helpful and consistent way
Use accepted standards for subdivision within a class whenever possible
Sub-divide classes that are too large; create a rule or system for
determining when such sub-divisions are appropriate.
Document the rules of the system
Desirable properties for a classification design--each
characteristic used as the basis for a property should:
distinguish some objects from others
be relevant to the purpose of the classification scheme
be definite and ascertainable for each member of the class
be permanent, to avoid the need for constant reclassification
Homework 2: Evaluating Teaching and Learning
Due: midnight Tuesday 10/5 in the Assignments tool in Canvas
Format:
Completed worksheet. See prompts below.
Instructions:
In this assignment you will evaluate the exercise you designed and presented.
Explain your assignment design:
Did your assignment function as expected in the classroom? Explain.
Explain the evaluation of your assignment:
What was the evaluation criteria--i.e., how did you know if students met the objectives?
How many students met the objectives?
Reflect on these results:
How would you improve this assignment in the future? Explain.
Evaluation Criteria:
all prompts are answered clearly and completely
substantive, thoughtful reflective responses provided as applicable
writing conforms to conventions of Edited American English
Oral History Project Next Steps
Check the spreadsheet in Canvas → Files → service_learning → oralhistory_narr_list_student.xlsx to see
which narrator you've been assigned
Do some research:
read about transformational leadership (PDF in the same folder as the spreadsheet: gibbon_transformationalleadership.pdf
use the URL in the spreadsheet (if applicable) and read more about your narrator
check the "Research Topics" field in the spreadsheet and do some more research and reading to prepare
Make first contact with your narrator: phone first, then send a follow up email
as applicable (see note in the spreadsheet). Be professional when contacting narrators:
Introduce yourself and indicate that you are from Lourdes University
Mention that you are working on the Oral History project with Amelia Gibbon and Reinvest Toledo
Be as flexible as possible when setting up a time to talk, and be sure it's clear whether
the interview will be phone, Zoom, or in person (their preference)
Refer them to me if they have any questions that you cannot answer: "My instructor, Susan
Shelangoskie, can follow up with you about that. When is a good time for her to call you?"
Thank them for being willing to share their time and story
Be prepared to make multiple attempts to contact your subject: don't give up, just
keep trying different times of day until you get through.
Track all of your time for these tasks in your Service Learning Log spreadsheet
data that describes materials or files in a repository. A library
catalog is an example of metadata: you can see a description of a specific
primary material, but not the object itself. The Dublin Core Metadata Initiative is
a commonly used set of metadate properties.
primary database:
stand-alone document that does not link to or manage other files.
A corpus and concordance are types of primary
databases.
flat database:
a classification scheme that is defined by independent properties/axes that
can be described for each member of the set. A flat database can be contained in
a single table.
relational database:
a classification scheme that is defined by a series of datasets and
described relationships among them. They are typically linked by a
primary key, a unique index that may be expressive
or inexpressive. All related data tables and the relational rules are
necessary to describe the database.
independent relationship:
database relationship where the data in multiple
tables can be correlated, but exist independently of each other.
dependent relationship:
database relationship where integrity is reinforced
between records in two tables. For example, if a master record is deleted,
all related records in the other table are also deleted.
field:
one cell of information in a record. A field has a specific content type.
content type:
the type of information that will be recorded for a specific property in a dataset. Each field of a database will have a content type.
The possible content types will vary depending on the database system or programming/query language used to encode the data. However, some
typical types are boolean, numeric (e.g. double, int), string/character, formatted (e.g. date, time).
boolean:
a content type that stores binary data (true/false; yes/no; 0/1). The value of the binary will be determined by
which database system or programming or query language used to encode the data.
numeric:
a content type that stores data as numeric values. Often there are specific subcategories such as short/long integer, double (decimal values).
Mathematical operations can be performed with numeric values.
string/character:
a content type that stores data as a string of characters: for example, words/text or a collection of characters of any type. Some databases
limit the length of string fields (typically the limit is 255 characters) or differentiate between a limited "string" field and an unlimited "text" field for
longer strings of data. Mathematical operations cannot be peformed using string fields, but there are many string handling functions that can be
used to analyze data of this type.
formatted:
a content type that requires a specific data format for data entry and display. The format type, such as a specific date or time format,
is selected when the database is designed, and then typically a format mask will be provided to the user at the time of input. Data that does
not match the required format is rejected.
format mask:
a data entry aid that shows users the required format for data entered in a formatted field. For example: ##/##/#### or ##:##xm.
A format mask aids in data validation.
data validation:
A process for checking the data entered into a field before accepting the value in the database. Strong data validation rules ensure
data consistency, but they can also lead to the loss of outlier data.
controlled vocabulary:
using an agreed-upon set of terms to classify within the system to avoid duplication or orphan data. For example: LoC subject headings.
index or identifier or primary key:
an indexing field that is unique for every member in the set. It may be
expressive or inexpressive. Your Social Security Number is your primary key index value as
a citizen/authorized resident of the United States. Your "900 number" is your primary key index value as a
Lourdes University Student.
For example, a Dewey decimal number on a book in a library collection, or the title of a book and a collection
of novels.
expressive notation:
the use of index terms that express meaning about classification system being used. For example
the Dewey decimal system. Sometimes expressive systems are incompletely expressive--
that is, some properties are signaled by the index, but some are not.
inexpressive notation:
the use of index terms that uniquely identify members of the class but do not
signify any information about the classification system. For example, the book title in a collection
of novels.
scope notes:
description of the scope of a class within a classification system. Sometimes the name of the class is sufficient, but these notes can be used when not.
Guidelines for Classification
Avoid cross-classification in one-dimensional schemes/properties
Be consistent in the sequence of properties for each member of the class
Sequence values in an array of values in a helpful and consistent way
Use accepted standards for subdivision within a class whenever possible
Sub-divide classes that are too large; create a rule or system for
determining when such sub-divisions are appropriate.
Document the rules of the system
Desirable properties for a classification design--each
characteristic used as the basis for a property should:
distinguish some objects from others
be relevant to the purpose of the classification scheme
be definite and ascertainable for each member of the class
be permanent, to avoid the need for constant reclassification
In-Class Exercise 9: Conceptualizing a Database
Instructions:
In this exercise, we'll use our classification system developed in In-Class #8
to start creating a database.
Our candy company is designing a new order tracking system. The first step
is to create a system for describing the stock items, identifying the
customers, and creating orders for individual customers. The chief data
analyst suggests these data tables:
Candy characteristics
Customer information
Orders
Order items
She also suggests a dynamic list as a support table with size/packaging
options.
Participate in the discussion to help further define the fields
for these tables.
Candy characteristics
Fields discussed last time:
candy_name
candy_brand
perishable
sugar_free
nuts
stick
1. Why might it be a good idea to separate this information
from the "size/packaging" information?
2. Should "size" and "packaging options" be 1 field or 2? Think about the types of values
that would be tracked for these and explain your answer.
Customer Information
What fields to we need? Let's keep it simple--just the basics.
Orders and Order Items: Topics
order items can be thought of as a one-to-many dataset
of an order
why is it a good idea to create the orders within the database?
what fields are needed for "orders"?
what fields are needed for "order items"?
how would indexing work?
create an index for order number using an inexpressive notation method. Explain
create an index for order number using an expressive notation method;
explain the rule(s) used to create the index terms systematically.
Support Table: Dynamic Controlled Vocabularies
How strong should the data validation be for the use
of this/these controlled vocabularies?
In-Class 10: Building a Database
Instructions:
In this exercise, we will use the database plan generated by the class in In-Class #9 to
start building the database.
We will use Microsoft Access
in class because this is the database software that is available on University computers.
This exercise will be completed over two class periods.
Part 1: Learn the Interface
Follow the instructions to explore the table in design view. Note the different
possible data types and how to create simple validation rules
for entering data into a field.
Follow the instructions to create a new table
Part 2: Structure
Add indexes and primary keys to tables as needed based on the database plan developed last time.
Work with the relationships pane as instructed to create a relationship between tables.
Week 8: Unit 3--Introduction to Classification and Databases
Wednesday 10/13
In-Class 10: Building a Database (continued)
Instructions:
In this exercise, we will use the database plan generated by the class in In-Class #9 to
start building the database.
We will use Microsoft Access
in class because this is the database software that is available on University computers.
This exercise will be completed over two class periods.
Part 3: Create an Input/Display Form
Follow the instructions to use the Form Wizard to create a form based on the main table.
Follow the instructions to add a subform based on the "order_items" table.
Modify the input form for functional aesthetics.
View the form, and test inputting some data
Part 4: Create a Query
In order to display the data in a useful way, the information from the main table and features table needs to be combined into
one table, based on criteria you select. This functionality is accomplished through a Query. A language called SQL is used
to author querys, but the coding is done automatically for you in Database programs like Access.
Follow the instructions to create a new Query that draws information from multiple tables.
After watching the examples of flitering and sorting, set your Query to show only one order.
Run your Query. Then, switch to SQL View to see how these conditions are coded.
Part 5: Create a Report
Ultimately, collected data is only useful if it can be displayed in some purposeful way. This function can be accomplished with a report.
Follow the instructions to use a Report Wizard to create a report based on the Query made in Part 5.
Quiz 2
Due: The quiz is open from 5pm Wed 10/13 through noon Wednesday 10/20
Instructions:
Access Quiz #2 online through the Quizzes tool in Canvas. This is an untimed quiz. It is recommended that only a
wired internet connection or reliable WiFi connection be used.
Quiz #2 covers the definitions and concepts related to databases discussed in Unit 3. You may wish to review
the reference readings and definitions for this unit and have available the completed database before
taking this quiz. The quiz includes multiple choice,
true/false, and short answer questions.
This quiz is OPEN reading, notes, and database. You may retake the
quiz one time if desired.
The highest score of the two attempts will be recorded. Note: this quiz is created from a pool of questions, so a
second attempt will have a different set of questions than the first.
Oral History Project Next Steps
Check the spreadsheet in Canvas → Files → service_learning → oralhistory_narr_list_student.xlsx to see
which narrator you've been assigned
Do some research:
read about transformational leadership (PDF in the same folder as the spreadsheet: gibbon_transformationalleadership.pdf
use the URL in the spreadsheet (if applicable) and read more about your narrator
check the "Research Topics" field in the spreadsheet and do some more research and reading to prepare
Make first contact with your narrator: phone first, then send a follow up email
as applicable (see note in the spreadsheet). Be professional when contacting narrators:
Introduce yourself and indicate that you are from Lourdes University
Mention that you are working on the Oral History project with Amelia Gibbon and Reinvest Toledo
Be as flexible as possible when setting up a time to talk, and be sure it's clear whether
the interview will be phone, Zoom, or in person (their preference)
Refer them to me if they have any questions that you cannot answer: "My instructor, Susan
Shelangoskie, can follow up with you about that. When is a good time for her to call you?"
Thank them for being willing to share their time and story
Be prepared to make multiple attempts to contact your subject: don't give up, just
keep trying different times of day until you get through.
Track all of your time for these tasks in your Service Learning Log spreadsheet
Week 9: Unit 4--Oral History and Digital Archiving Project with RT and TLCPL
Monday 10/18
Fall Break--No Class
Week 9: Unit 4--Oral History and Digital Archiving Project with RT and TLCPL
Wednesday 10/20
Databases: Topic Review/Wrap Up
What did you learn about properties of data objects?
What did you learn about database design?
What did you learn about implementing a digital relational database?
Key Terms (review)
metadata database:
data that describes materials or files in a repository. A library
catalog is an example of metadata: you can see a description of a specific
primary material, but not the object itself. The Dublin Core Metadata Initiative is
a commonly used set of metadata properties.
field:
one cell of information in a record. A field has a specific content type.
content type:
the type of information that will be recorded for a specific property in a dataset. Each field of a database will have a content type.
The possible content types will vary depending on the database system or programming/query language used to encode the data. However, some
typical types are boolean, numeric (e.g. double, int), string/character, formatted (e.g. date, time).
data validation:
A process for checking the data entered into a field before accepting the value in the
database. Strong data validation rules ensure
data consistency, but they can also lead to the loss of outlier data.
controlled vocabulary:
using an agreed-upon set of terms to classify within the system to avoid duplication or orphan data.
For example: LoC subject headings.
scope notes:
description of the scope of a class within a classification system. Sometimes the name of the
class is sufficient, but these notes can be used when not.
Workshop 1: Metadata
In this workshop we will learn about the metadata that we will use to describe our
oral history data. We will learn about the metadata fields that are tracked by TLCPL for
data of this type, and we will use the scope notes provided by the library
to determine what data we need to enter.
Part 1. Preparation
Go to our class Canvas site and navigate to Files → ws01
Download the 2 files in the folder: 2017-07-11Metadata_Manual.docx and
oral_history_metadata_spreadsheet.xlsx.
Open both of the files in Word and Excel (respectively)
Part 2. Metadata Fields
Participate in the class discussion and exercises for learning about the fields and
determining the appropriate values for the fields.
Fields
Title
Collection Title - Discussion: what should our collection title be?
Collection Part
Creator
Description - Exercise: analyzing a description (see below)
Subject - Demonstration: using the scope notes
Coverage - Note: use the location where you recorded the interview
Latitude and Longitude - Demonstration: finding latitude
and longitude
Place
Time Period - Discussion: period associated with the content; using the
drop down list in the spreadsheet
Date of original - Note: date you recorded the interview
Searchable date - Demonstration: using the scope notes
Language
Full Text - Transcription (we will discuss/practice in Workshop 2)
Repository
Publisher (original)
Rights URI - Exercise: Copyright
Rights description - Discussing: using a controlled vocabulary
Rights holder - Note: use if option 3 is selected
Date digitized
Type
Format (original)
Extent (original)
Format (digital)
File Name - Exercise: file naming conventions
Asset File Name
Exercise: Analyzing a Description
Read the sample description below and then answer the questions:
David Shugar grew up in Maumee, Ohio. One of his greatest stories was about going
to the Maumee Library and getting to know the librarian and discovering the variety of books that were
available. He attended Maumee Schools, where he played in the high school band. His life centered around
his love of cars, Ford Mustangs, and his work for Delta Airlines, and at the age of fifty, he retired.
He investigated several activities to become involved in in his retirement, one of which was the
Maumee Community Band. This oral history was recorded with David and his wife Candace at the
Maumee Branch Library in the Children’s area on the morning of June 15, 2017 by TLCPL Local
History Librarian, Irene Martin.
How would you characterize the information presented here?
Based on this sample, what elements are required for a description?
What should be the approximate length of a description?
Exercise: Copyright
Review our release statement (Canvas → Files → service_learning → Oral History
Participant Relase Form.docx and review the 3 copyright options.
Indicate which one you think aligns with each of our 3 options.
Exercise: File Name Conventions
Go to the "File Name" section of the scope notes starting on page 28
Review the guidelines
List elements you think would be important to represent in the filename for
our files--consider that we may have image files and will have PDF transcript files in
addition to the sound file.
What are your recommendations for file naming conventions:
3. Follow Up
Upload your raw audio file to our shared drive.
Be sure to use the agreed upon file naming conventions.
Upload any additional image files provided by your narrator
Download a copy of the oral_history_metadata_spreadsheet.xlsx (see Part 1. above)
Enter your metadata as we discussed in class
Submit your completed spreadsheet in Canvas → Assignments → WS1
Note: You will not receive points for the workshop until you have
submitted your raw sound and image files and completed metadata file.
Quiz 2
Due: The quiz is open from 5pm Wed 10/13 through noon Friday 10/22
Instructions:
Access Quiz #2 online through the Quizzes tool in Canvas. This is an untimed quiz. It is recommended that only a
wired internet connection or reliable WiFi connection be used.
Quiz #2 covers the definitions and concepts related to databases discussed in Unit 3. You may wish to review
the reference readings and definitions for this unit and have available the completed database before
taking this quiz. The quiz includes multiple choice,
true/false, and short answer questions.
This quiz is OPEN reading, notes, and database. You may retake the
quiz one time if desired.
The highest score of the two attempts will be recorded. Note: this quiz is created from a pool of questions, so a
second attempt will have a different set of questions than the first.
Week 10: Unit 4--Oral History and Digital Archiving Project with RT and TLCPL
Monday 10/25
References
Introduction to Oral History pp. 15-16
Style Guide - A Quick Reference for Editing Oral History Transcripts
Workshop 2: Transcribing
1. Transcription
Go to our Canvas site → Files → wk10
Download/access the file wk10_introtooralhistory.pdf and follow
along in the review of information on pp. 15 and 16. Discussion of transcription vs.
time-subject indexing.
Discussion: Creating a transcription
Use a standard word processed file
Start with a header that includes: Name: FirstName LastName Date of interview: Month dd, yyyy Location: Address [Zoom, phone] Interviewer: FirstName LastName Project: Title
Demonstration: using Inqscribe to help make transcribing/editing a raw trascript file
easier.
When your transcription is complete save it as a PDF file.
Transcribing Tips
You may have a plain text transcription to start with, depending on which
audio recording method you use. Even so, you need to carefully edit the transcription
correcting errors, adding paragraphing, and adding time codes and speaker identification.
You may wish to use a transcription software to aid you; there are several available.
I recommend Inqscribe,
free software that allows you to slow down and easily pause the recording and create shortcuts
for adding time codes and speaker id.
You will probably need to edit your raw audio file. We want to preserve the most authentic
version of the interview possible as the master file, so use the guidelines below as you determine
what to edit.
OK to edit
DO NOT edit
preliminary chat/sound before the interview officially began
extra sound/space at the end of the interview
lengthy pauses within the interview: Note:
trim these rather than eliminating altogether to indicate that the speaker
paused for thought.
false starts
reprasing/correction of misspeaking
do not remove content editorially--maintain the complete interview
in as authentic a form as possible.
To edit your audio file, I recommend using a free audio editor like Audacity
You may also be able to do some simple editing in the recording app you used to create the file
or use a default editor that comes with your OS.
Demonstration: Audacity
If your recorder uses .m4a files, you will also need to download the FFmpeg plug-in and
follow the installation instructions.
Tips for Working with Audacity
Use File → Import to open the audio file and start editing
Use the Selection tool to identify a segment of track to cut
Use the Scissors tool/cut tool to remove a selected segment of audio
Use Save Project → Save Project As... to save the file in .aud3 format,
which you can return to and edit in Audacity (but which is not otherwise a playable file)
Use Files → Export to create the master mp3 file. Choose mp3 as the
format.
Remember to use the file-naming convention: lastnamefi_int
After hitting "Save," the mp3 metadata form will appear. Enter this info:
Artist Name = Narrator FirstName LastName
Track Title = "Interview of " FirstName LastName
Album = Lourdes University DMS 300 F21: Toledo's Finest
Year = 2021
Genre = Oral History
3. Follow Up
Practice editing an audio file. For this practice, you can use your raw audio file from
our practice interviews. These files are available in our shared drive in the test_files → raw folder.
Practice trimming content: create a 2:00 excerpt of the file.
Exporting the file as an mp3 with appropriate metadata.
Use your last name as part of the file name for the purposes of this exercise
Practice creating a transcript. For this practice, use the 2:00 minute audio file created in 1 above, either
the test audio or your actual interview. Create a finished transcript with properly formatted
time codes, speaker id, and paragraphing.
Save the word processed file as a PDF. Remember to use the appropriate file naming convention.
Upload these files to WS2 in Canvas Assignments:
your edited audio file
your word-processed transcript file
your PDF trascript file
Week 10: Unit 4--Oral History and Digital Archiving Project with RT and TLCPL
Wednesday 10/27
Individual help with audio editing and transcription
Meet in SAH 164 -- 2:35-3:50pm
WS2 Follow Up due by midnight
Homework 3: Oral History Data
Due: midnight Friday 11/5 in the Assignments tool in Canvas
Format:
Completed metadata row in class spreadsheet
Submitted complete transcription
Part 1. Metadata
Use the skills from Workshop 1 to enter all of the metadata for your oral history in the class worksheet.
Be sure to follow formatting conventions for each field, to complete each required field, and to double check your work.
Part 2. Edited Audio File
Use the skills from Workshop 2 to edit your audio file to remove extraneous sound from the beginning and
end and enter appropriate metadata for your mp3 master. You may also need to convert your file to
mp3, depending on the original recording format.
Part 3. Transcription
Use the skills from from Workshop 2 to create a complete transcription for your oral history.
Be sure to use time codes and
to follow best practices for formatting the data.
Evaluation Criteria:
Metadata
all metadata fields are completed with accurate data
metadata is in the appropriate format following the conventions of Dublin Core, MDOS, or TLCPL as applicable
Audio File
audio file has a name that follows the file naming conventions for the project
audio file has correct metadata
audio file is in mp3 format
audio file is trimmed of excess sound from the beginning and end
Transcription
the transcript has a correctly formatted header with all of the required information
the transcript uses a time code structure in the appropriate format
the content of the interview is accurately represented
trascription best practices are followed (see Style Guide provided)
transcription PDF has a file name that follows the naming conventions for the project
use lastnamefirstinitial of the person interviewed as the root of the filename and the indexing
term. For example, if you had interviewed me, the root for all of the associated files would be shelangoskies
add an underscore "_". In our example: shelangoskies_
add the code for the file type:
ts for the trascript of an audio file: shelangoskies_ts
int for the sound file of the interview itself: shelangoskies_int
img for an image file (optional): shelangoskies_img
if there are multiple files of a certain type, add a numbering system with 3 digits:
shelangoskies_img001
shelangoskies_img002
shelangoskies_img003... etc.
List of Fields to Enter
If you have questions, see the data in the template and the scope notes for more
information.
This week, you will complete the following data entry (note that there will be fields
you will leave blank. These will not show up on the public item and exhibit
pages.):
We will use the metadata tracked in the spreadsheet from Workshop 1 as the basis for information
in the web database. If you have not yet completed this metadata, then watch the demonstration
in class, and take notes about which fields from the spreadsheet match to fields in the online
database. Note: not all of the spreadsheet fields will be used
in the online database.
From the menu on the left, click on Items
Click on the Add Item button at the bottom of the item list.
Note the available tabs at the top of the add/edit item interface:
Dublin Core
Item Type Metadata
Files
Tags
Map
Always start with the Dublin Core tab.
Dublin Core Metadata
The Dublin Core Metadata
is a standardized set of fields, some with controlled vocabulary and all with clear guidelines
(see link) that have been adopted by many libraries, includng TLCPL. Use the table below to see which
TLCPL spreadsheet fields correspond to the Dublin Core fields in our digital exhibit.
Note: enter the field data exactly as it is in the spreadsheet;
use the TLCPL Metadata Manual to help you format each field correctly (see Workshop 1
for more information.
TLCPL Metadata Spreadsheet Field
Omeka Online Database Field
Title
Title
Subject
Subject
Description
Description
Creator
Creator
Date of Original
Date
Contributor
*Use this one if you are working with a partner; the creator should be
the person who created the digital file. The contributor is the other student.
Contributor
Rights Description
*you may not know this yet if your narrator has not returned the
copyright agreement yet.
Rights
Format (Original)
Format
Language
Language
Type
Type
Coverage
Coverage
Item Type Metadata
Click on the Item Type Metadata tab (in the Edit Item area)
Select "Oral History" from the dropdown list
Enter the fields as described below
Field
Notes
Interviewer
Enter the name of interviewer(s)in LastName, Firstname format. If there
are 2 interviewers, separate names with a semi-colon.
Interviewee
Enter the name of the narrator in LastName, FirstName format.
Location
Enter the location address or Phone or Video Conference
as applicable.
Transcription
click the Use HTML checkbox
Copy your transcription from your word processed file and
paste it into the HTML editor.
Original Format
Use the data from the Format (Digital) field
of the TLCPL spreadsheet.
Duration
Use the data from the Extent field of the TLCPL spreadsheet.
Files
Click on the Files tab.
Click on Choose File.
Select your audio file--be sure it is the finished .mp3 file named according
to our naming conventions for the project.
Click Save Changes
If you have images that have been provided by your narrator, repeat this process to add them.
Be sure images have been named according to file naming conventions for the projec before
they are uploaded.
Map
Click on the Map tab
In the Find box, enter the Latitude, Longitude
from the TLCPL metadata spreadsheet.
Click Save Changes
Follow Up
To complete this workshop, add your item and enter all of the metadata as indicated above.
Then submit your Item's public URL to Homework #4 in Canvas.
Finding the Public URL:
Log in
Click on Items
Click on the title of your item
Click on View Public Page
A new tab will open. Copy the URL from the new tab: this is your Public URL.
Week 11: Unit 4--Oral History and Digital Archiving Project with RT and TLCPL
Wednesday 11/3
Workshop 4: Creating an Exhibit Page
Creating your Exhibit Page
Click on Exhibits from the left navigation menu
Click the Edit link beneath the "Toledo's Finest" exhibit
Scroll to the bottom and click on Add Page
Enter a page title (during the workshop, you can enter a placeholder title)
Enter a menu link title that is a shortened version if you have a lengthier title
Enter a slug: all lower case, no spaces, no special characters. This will become part of the URL for the page, so something
easy for users.
Select a layout: "File with Text" recommended.
Click Add new content block button at the bottom of the page
Click Add item and select one or both of your items, as applicable
You will enter a contextual introduction to your interview here (we will discuss this)
Click Save Changes
Contextual Item Introduction
Write an introduction for your item. Paragraph 1 should explain relevant historical and/or
conceptual context -- for example, discussing topics related to your narrator's profession
or activism in Toledo in the appropriate time periods. Paragraph 2 should connect this context
to the work or activism of your narrator.
Image
You should also consider adding an image to your item so it will appear
on your exhibit page. If your narrator supplies an image, be sure to upload that file first
and then your audio so that the image is the display item. (You can also re-order files--ask
if you need help). If your narrator does not provide an image, consider choosing a relevant
image that is copyright free.
A good source is Wikimedia Commons.
Follow Up
For WS4 -- Follow along during class to create the Exhibit page
For Homework #5 -- Fill in the information in your page, including
the researched item introduction. Submit the Public URL for Homework #5 in Canvas.
Finding the Public URL:
Log in
Click on Exhibits
Click Edit under "Toledo's Finest"
Scroll down and click on the name of your page to enter Edit view
Click on View Public Page
A new tab will open. Copy the URL from the new tab: this is your Public URL.
Homework 3: Oral History Data
Due: midnight Friday 11/5 in the Assignments tool in Canvas
Format:
Completed metadata row in class spreadsheet
Submitted complete transcription
Part 1. Metadata
Use the skills from Workshop 1 to enter all of the metadata for your oral history in the class worksheet.
Be sure to follow formatting conventions for each field, to complete each required field, and to double check your work.
Part 2. Edited Audio File
Use the skills from Workshop 2 to edit your audio file to remove extraneous sound from the beginning and
end and enter appropriate metadata for your mp3 master. You may also need to convert your file to
mp3, depending on the original recording format.
Part 3. Transcription
Use the skills from from Workshop 2 to create a complete transcription for your oral history.
Be sure to use time codes and
to follow best practices for formatting the data.
Evaluation Criteria:
Metadata
all metadata fields are completed with accurate data
metadata is in the appropriate format following the conventions of Dublin Core, MDOS, or TLCPL as applicable
Audio File
audio file has a name that follows the file naming conventions for the project
audio file has correct metadata
audio file is in mp3 format
audio file is trimmed of excess sound from the beginning and end
Transcription
the transcript has a correctly formatted header with all of the required information
the transcript uses a time code structure in the appropriate format
the content of the interview is accurately represented
trascription best practices are followed (see Style Guide provided)
transcription PDF has a file name that follows the naming conventions for the project
Oral History Project Next Steps
Check the spreadsheet in Canvas → Files → service_learning → oralhistory_narr_list_student.xlsx to see
which narrator you've been assigned
Do some research:
read about transformational leadership (PDF in the same folder as the spreadsheet: gibbon_transformationalleadership.pdf
use the URL in the spreadsheet (if applicable) and read more about your narrator
check the "Research Topics" field in the spreadsheet and do some more research and reading to prepare
Make first contact with your narrator: phone first, then send a follow up email
as applicable (see note in the spreadsheet). Be professional when contacting narrators:
Introduce yourself and indicate that you are from Lourdes University
Mention that you are working on the Oral History project with Amelia Gibbon and Reinvest Toledo
Be as flexible as possible when setting up a time to talk, and be sure it's clear whether
the interview will be phone, Zoom, or in person (their preference)
Refer them to me if they have any questions that you cannot answer: "My instructor, Susan
Shelangoskie, can follow up with you about that. When is a good time for her to call you?"
Thank them for being willing to share their time and story
Be prepared to make multiple attempts to contact your subject: don't give up, just
keep trying different times of day until you get through.
Track all of your time for these tasks in your Service Learning Log spreadsheet
Enter your data into the spreadsheet as indicated in Workshop 1.
Review the information for copyright and file naming in the resources section
below.
Week 12: Unit 4--Oral History and Digital Archiving Project with RT and TLCPL
Monday 11/8
Workshop 5: Writing an Exhibit Introduction
Brainstorming
Work on your own or with a partner (as assigned) to brainstorm ideas for our exhibit introduction.
Content
List some of the significant context you learned about related to your interview:
List some of the most significant things you learned form interviewing your narrator:
List some of the most significant things you learned from participating in this project:
Links
Visit the Exhibit Introduction Draft
and enter any links that would be relevant for the intro--whether from your research or specifically
about your narrator.
Editing
Participate in the class discussion about editing the introduction.
Week 12: Unit 4--Oral History and Digital Archiving Project with RT and TLCPL
Wednesday 11/11
Workshop 6: Planning a Launch Event
Our final task for the term, is to launch our exhibit. This week,
we need to answer the questions below and assign areas of responsibility
among class members.
Planning
Do we want a live event or to promote just the site itself?
live event: What would the event entail?
online event: What
supplementary materials would we want to develop?
What are our goals in promoting the exhibit? There is always the
philosophical argument of public education for the sake of the public
good, but more pragmatically, what can we accomplish for our community
by promoting viewing the exhibit?
How will we accomplish our goals?
How will we measure our success? We have Google Analytics installed,
so we will have some data, but what are our metrics for success?
Do we want to develop any additional assessment or feedback--viewer
comments, a survey, etc.?
After discussing the areas above, we will determine tasks that need to be accomplished, assign
responsibilities, and create a timeline for completing tasks.
Week 13: Unit 4--Oral History and Digital Archiving Project with RT and TLCPL
Monday 11/15
Workshop 7: Planning a Launch Event--Video
Meet in St. Agnes Hall
1. Interviews for the video
what was something you learned from the experience of working on the project?
what was something you learned from the person you interviewed?
2. Audio and images
Select 3-4 audio clips of 10-15 seconds each to potentially be included in our
event video. When selecting, use clips where the narrator explains a significant
life philosophy, or a part of the interview that you emotionally connected with,
or that you felt was especially meaningful.
Find some copyright-free images that go with your audio clips. A
good place to look is Wikimedia Commons
-- the images here are copyright free.
post materials by midnight to our drive in the audioclips_img folder
3. Update on Planning
Franciscan Center is available on 12/7
Space, projection and operator, tables/chairs are free
We do have a budget for food
We will have a practice/run through in our 12/1 class
Week 13: Unit 4--Oral History and Digital Archiving Project with RT and TLCPL
Wednesday 11/17
Workshop: Marketing and Evaluation
We will divide into 2 teams: marketing and evaluation. The marketing team
will work with me to develop our ideas, materials, and timeline. The evaluation
team will work with the University director of assessment to develop a valid
evaluation survey for the event.
If it is available, we will watch a raw cut of the video.
Marketing
Ask Chelsea about writing a story in Sylvania Advantage to promote the event
assigned to: [volunteer needed]
due: as soon as possible after class Monday 11/15
Create social media posts to promote the event
assigned to: [Sarah]
due: 11/17-event date
Create QR code for flyers to link to event and to our evaluation survey
assigned to: [volunteer needed]
due: asap after materials are posted
Create flyers to hang up on campus promoting the event
assigned to: [Sarah]
due: asap--ideally posted a week before the event
Evaluation
Create survey for evaluating the event (formulate questions, create digital version, post)
assigned to: [volunteer(s) needed]
due: before the event
Homework
Build digital item and exhibit pages in Omeka
assigned to: students who have completed their interview but have not finished this yet
Week 14: Unit 4--Oral History and Digital Archiving Project with RT and TLCPL
Monday 11/21
Peer Review and User Testing
Advanced Preparation
Prior to the Peer Review, you should complete the following items:
Fill out the metadata spreadsheet for TLCPL. Find the spreadsheet in Canvas:
Files → ws01. Turn in the spreadsheet as part of Homework #3.
Edit your audio file and convert it to .mp3 format if it is not already in that format.
Be sure to use our File Naming Conventions. Post the completed .mp3 to
your Omeka item that you create for Homework #4.
Create a complete transcript of your file. Be sure to include the transcript header and use
correct formatting for the transcript itself. Add the transcript to your
Omeka item that you create for Homework #4
Create your Omeka Item. Be sure to enter the necessary metadata fields.
Include your audio file and paste in your transcript. Submit the public/view URL for
Homework #4.
Create your Omeka Exhibit page. Inlcude your 2 paragraphs of context
and link to your Item. (Instructions here). Turn
in the public/view URL for the finished Exhibit page for Homework 5.
Complete the advanced preparation by midnight, Sunday 11/21
Completing the Peer Review
Due by midnight, Monday 11/22
Review the work of one of your classmates and evaluate as indicated. Remember that your
careful constructive feedback is helpful to your classmate to help them identify issues that
can be fixed before final grading takes place.
Evaluate the criteria listed below. For any "No" responses,
provide comments and suggestions.
The review will be conducted online on Monday 11/22.
Post your links by midnight Sunday 11/21 at the latest
How to complete the Review
Go to the Discussions tool in Canvas
Access the links posted by the classmate you are reviewing
Complete the review--and remember, you're helping your classmate and improving our overall exhibit by providing honest,
detailed feedback
Discuss your review with your partner
Criterion
YES
NO
Comments
Are all of the required metadata fields provided for each item?
Does the item description conform to the format for descriptions in the library collection?
Does the exhibit page introduction provide informational historical/cultural context for the item(s)?
Does the exhibit page introduction connect the context to the specific item(s)?
Is there other information you'd like to know about the item(s)?
Is there other information you'd like to know about the cultural/historical context?
Is the tone appropriate and consistent with the overall exhibit?
Does the exhibit page link to external sources for more information as appropriate?
Does the writing (items and exhibit page) conform to standard of Edited American English?
Is there a block with references provided at the end of the exhibit page?
Are the references complete and formatted correctly (MLA)
Other Comments
Week 14: Unit 4--Oral History and Digital Archiving Project with RT and TLCPL
Wednesday 11/23
Thanksgiving Break--No Class
Week 15: Unit 4--Oral History and Digital Archiving Project with RT and TLCPL